Sunday, October 13, 2019

Longleaf Pine Needles: A Closer Look

We've been having a drought. It didn't rain all of September. The pine trees in my yard have been throwing down needles. I got a special rake just to deal with it. After I used my new rake and got the ground all nice and clean more pine straw fell. I decided to pick it up more carefully and sell it for crafts. I made a sample basket just to use in my photo of the needles.

One problem with picking up pine straw one at a time by hand is chiggers. I have several chigger bites right now and I haven't been in the woods at all. All I've done is pick up pine straw from my lawn. I'd be mortified if somebody got a chigger bite from a package I sent them. So I boil the pine straw in a concoction containing glycerin. Then I leave it in there overnight to cool off. Then I rinse the needles well and dry them in the sun. Repeat.
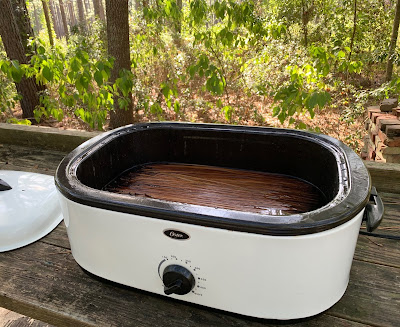
Boil it up
Yesterday when I was picking up the day's batch of pine straw I found 2 odd ones. They had 4 needles instead of the usual three. Then today I found 2 more odd ones. They had 2 needles. I decided I needed to look at these up close. Here is what I learned.

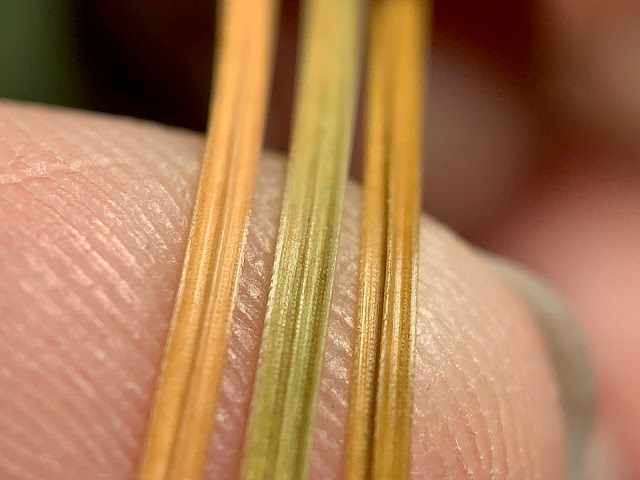
  1. The rough feeling edges are a badass row of spines angled toward the very sharp pointy tip.
  2. Three needle bundles are a neat triangular packing scenario. But four comes out as an overlapping pinwheel arrangement. The 2 needle one has cup shaped needles and a hole up the middle
  3. Longleaf pine needles are a helix and the number of needles = the number of turns
  4. The 4 needle pine straws are heavier per unit length than the 3 needle ones. Comparing individual needles I mean. It's not just that there's an extra one
Questions that remain unanswered:
  1. What happens that makes some pine straws have a different number of needles? Is it a recessive gene?
  2. What makes the gene expression happen? Chaos?
  3. Is it the same thing as three leaf clovers having 4 leaves sometimes?
  4. How come the number of turns in the helix equals the number of needles in the bundle? This is not a Fibonacci sequence. It's something else. Nothing I could find about helix math addresses this inside shape business.
  5. Why did I only find one paper with a cross section image of a pine needle? And it was from New Zealand. Come on!

Here are some images from my toy USB microscope
Sharp tip of a 3 needle pine straw, 10x

Spinose margin of a 3 needle pine straw, 60x

Cup shaped back side of a needle from a 2 needle pine straw, 10x

Trying-to-be-a-triangle back side of a 3 needle pine straw, 10x

Giant ridge on the back of a needle from a 4 needle pine straw, 10x

Here's some cross section images taken with my phone with a Moment Macro lens

Sections sliced with a razor blade in a drop of water

Sections through the fascicle, held together with thread and hot glue.

The helical design of the n=2 pine needles I looked at came out with decreasing pitch with the increase in number of needles.

2 needle straw, 9 1/2" long/2 turns = 4.75" pitch

3 needle straw, 10" long/3 turns = 3.33" pitch

4 needle straw, 12" long/4 turns = 3" pitch

I could examine n=15+ of 3 needles pine straws and see if pitch is consistent or if number of turns is consistent over various lengths. I'm guessing the number of turns is the same and pitch will vary with the length of the needle. But it was obvious just looking at them that the 4 needle straw is a higher pitch helix. A lot of needles I pick up seem to be more twisted though. I should see if I can tell what is different about them. I usually don't keep those as the flatter ones are nicer for coiling into a basket.

Finally I was curious about the mass per length. The 4 needle straws just feel chunkier.

12" of pine needle: 4" x 3 of a three needle straw  = 0.14 g 
vs 3" x 4 of a four needle straw = 0.16 g
(Sorry for using inches instead of cm. I measured off this cutting mat marked in inches. 12" = 30.48 cm)
3 needle straw = 0.0046 g/cm

4 needle straw = 0.0052 g/cm
This is rather meaningless with a scale only precise to 0.05 grams, but I just felt like the 4 needle straw was so much beefier I wanted to know if it was the individual needles or if it was an illusion because there was one extra.

I drew my observations so I could remember what I learned. If I find more of these aberrant pine straws I'll increase n.


**UPDATE 13 October 2019 **

I found more 2 and 4 needle pine straws today. My hypothesis about the number of needles = number of twists would appear to be false.

A days collection of 2 and 4 needle pine needles
I picked up a few hundred 3 needle pine straws and ignored thousands more. I mostly pick them up by color. I go for the brightest yellow ones because they're the freshest. UV darkens them after the chlorophyll goes away.

I have a new hypothesis about the twists. I saved 2 regular 3 needle pine straws to examine closely. One had almost no twist at all. It also had 3 distinctly different colors of needles so it was easy to verify it didn't twist. The underside of the needles seemed very symmetrical.

Needles with hardly any twist. Very symmetrical.

Trying to capture the height of the middle ridge 
I also saved a super twisty one. This one is so twisty the needles tangle up and require careful separation. 

I didn't take a photo like this of the other bundle because there was nothing to see. It was just straight.This one twists hard.

This pine straw is so twisty it was hard for me to get the needles all flat for a photo

I had to do them one at a time. See how the center rib is offset? I bet that's why it twists like crazy. You can count the rows of stomata. There are more on the left side than on the right.
I wonder if I had a good method for sealing these in their original shape and taking a cross section and a good microscope could I identify some structural component inside that would reveal the symmetry or lack of it in each bundle? I'm not sure it matters. Just basic knowledge I guess. Would be nice to know what is normal in case climate change makes something wacky happen. 

Meanwhile I'll keep stockpiling these wrong-number pine straws as I find them in case I get enough to actually constitute a statistically valid assessment. I should note I am not finding these all under the same tree. I found the two 2 needles straws on my actual front steps. The 4 needle straws I found today were in the shade on the North side of the shed. The other 2 needle straws came from over by the well. The 4 needle straws I found the day before were West of the shed and right by the steps to the lab.

Monday, September 30, 2019

It's an architectural problem

I watched the weekly diary video of SG Collins this morning and it was so concise I decided to dust off the old blog and post the links and transcribe it so I can refer back to it later.

For the sake of future me I'm also embedding the current event reference Collins is talking about. This is Greta.


And this is Collins. Rem acu tetigisti, Collins.


I've transcribed what Collins says (this is based on my limited training as an online transcriptionist where I was taught that it is ok to edit out extraneous conjunctions and mannerisms of spoken word irrelevant to the message.)

Greta I love, but based on some of the things that she says I think that she thinks that the people she’s talking to can do something. That they have the power to make change. A lot of people think that the politicians can fix it, or that world leaders can fix it. But I think that the problem that they’re trying to fix is kind of not something that any person can change because it’s institutionalized greed where there’s this sort of extra-corporeal creature that causes you to must-make-as-much-money-as-possible and to never do the right thing.
So I think she might think that people the people she’s talking to can make a difference. Maybe because I been around those people for all my life, or no, I’m sorry, I mean they’ve been around as long as I have, that it makes me think that she’s talking to the wrong people or she’s thinking of it the wrong way. 
If I could talk to Greta I would tell her that really the problem is an architectural one. The world is designed wrong. It’s designed accorded to nineteenth and twentieth century property principles. And I wish we could change that. Just change the way the world is designed so we wouldn’t be forced to do the things that people had to do because they were trying to sell cars and oil to us. But that’s just me. 
But millions of people are out in the street saying we want to change things. That can’t be bad. That has to be good. So I think it’s pretty splendid that we’ve got these young angry teenaged girls to tell us what for. Whether or not she’s that naive or if it’s me that’s naive? I don’t know.  — SG Collins 30 Sept 2019 

It was 7 years ago that I came up with the idea of doing a Small Year. My social isolation has allowed me to fend off that extra-corporeal creature as I've made only-as-much-money-as-necessary instead of as-much-as-possible. The farther I get from the more-money world the harder is is to make that necessary money. I can't make myself create things to suit other people's taste. I know that people are used to an overabundance of durable goods that cost less than than groceries. Mass produced imports are a boon to the must-make-as-much-money-as-possible world. I understand that a hand made item is inherently inefficient. I know there is little value in it as an item, but I still price things based on the idea that my time is worth something. Usually under $5/hr because I'm mostly selling prototypes, I'm not qualified for master level pricing. The value is in the making, which only the maker gets to enjoy. "People don't want to pay you for something if they think you enjoyed it" — Hank Green.

I price items just above what I think anybody will pay for them, yet still putting a much lower value on my time than I would get at a desk job. as a message to makers that what they are doing is worth something the rest of the world understands, dollars. I think of my Etsy shop as a place where people can go to steal my ideas as much as to buy something I made. Unlike sites that scrape my blogs or YouTubers who steal my videos, I don't mind if somebody looks at something I made and it sparks them to copy it for themself. (They just better not try to sell it.) I link to instructional videos for things I made right in the Etsy listings for people who want to make one themselves, if I was able to document it succinctly. And if somebody watches the video and think it looks too hard for them maybe they buy the thing from me and they can explain to admirers what was involved in making it, even if they didn't do it. I think that's important. But that's just me.

Maybe you'd like to buy something from my Etsy shop? Private URL registration is really expensive. I need the money.

Friday, September 13, 2019

Pine Straw Rake Review

I ordered a Yard Tuff Pine Straw Rake from Amazon. (Not sponsored, no affiliation in any way. These are available from lots of vendors.)

When UPS brought it the box was damaged but all the parts were there. Weight: 115 pounds or so. Supposed to be 90 lbs assembled. The UPS man put it on his dolly and wheeled it into my shed for me. We tore it open and checked all 24 tines were in there and he went on about his day.

The box and everything in it smelled terrible, like Harbor Freight. I unpacked all the parts out of the contaminated box and let them air out overnight. I put the tires and the gross box out in the yard.

Sockets needed for assembly
  3/4" x 2
  9/16" x 2
  7/8" x 1
  11/16" x 1
19 mm open ended wrench
(I don't have any Imperial wrenches and this was the closest I had.)
Two ratchet handles or similar

I used an impact wrench at first but it was just loud and the nylock nuts ran the battery down fast so I went to two ratchets instead.

Theres a problem with the angle brackets that the instructions say to put on after all the tines are assembled. I used the short bolts on the first part instead of long ones that would've gotten in the way of the tine assembly. So when I got to the angle brackets I had to take out 4 bolts out of tines to get the longer bolts through the holes with the heads toward the tines and the nuts on the outside. I used the open ended wrench to hold the bolt head while I tightened those nuts down. Then I put the bolts and nuts back through the tines. Seems fine, just not how the instructions say to do it.

Don't overtighten the nuts that let the rake tilt. Don't overtighten the nuts that hold the wheels on either.

I swapped out the light weight chain it came with for a heavier welded chain I had in the shed.

Most of the assembly can be done far away from the smelly tires. I scrubbed them down with Simple Green before I put them on the rake but they still reek of rubber. I just had to hold my breath and power through.

I think it's going to work just fine. I didn't find it needed extra weight like some reviews I read. My pine straw is extra long though, and my grass is pretty sparse. I can see how a really dense lawn with shortleaf straw would behave differently. I will update this review after I use it more. It's too hot and dry to do yard work right now.


Friday, June 7, 2019

Peach Jam with Rosemary and Ginger Flavor, Multiple Batch Process

My aunt brought me a box of peaches from Barney last Friday. That's about 25 pounds. There were 79 peaches in there. I managed to use up a lot of them fresh, but 65 of them got made into jam. I made a video. (Music: www.bensound.com)
 

I live in a tiny house with no stove. My procedure does not comply with Georgia Cottage Food Law since I do all the cooking outdoors. I accept the risk of contaminating my product as I eat it all myself. If you have a full kitchen you can work entirely indoors for maximum food safety. And if you have a big stove you can use two burners at once and streamline your process.
Winter better be coming, because I am ready.
Recipe for two batches of jam:
On the first day:
Start a stock pot of water boiling.
Prepare an ice water bath and a bowl of ascorbic acid to reduce browning. This is for all the peaches, not split into two batches yet.
  • 4 teaspoons Fruit Fresh
  • 6 Tablespoons water
Mix in a large bowl.

Get 24 ripe peaches out of the refrigerator. Chilling them first makes this part nicer.
Drop 6 peaches into the boiling water and count to 30. Remove the peaches to the ice water bath.
Replace lid and let pot boil up while you peel the skin off the first 6 peaches. Roll them around in the ascorbic acid as you finish them. I wear food prep gloves for this part because the acid in the peaches makes my skin rough.

Repeat for all the peaches.

You get to sit down for this next part. Cut out the pits and slice up the peaches into chunks. I don't like to cut too close to the pit or it gets woody bits in the jam. Put all the peaches into the bowl with the ascorbic acid. I squeeze the pit over the bowl to get all the peach juice.
Mix the cut up peaches after every one to coat in the ascorbic acid.

After all the peaches are cut up split them between two bowls. Add flavorings (5 sprigs of rosemary and a handful of sliced ginger in each bowl. Also add a teaspoon of Angostura bitters.)
Add 1 cup of sugar to each bowl. Use this amount for each batch.
  • ~ 6 cups cut up peaches
  • 5 sprigs rosemary
  • 2 + tablespoons sliced ginger
  • 1 tsp Angustora bitters
  • 1 cup sugar
Stir, cover, and refrigerate until the next day. Stir occasionally if you think about it.

Next day:
Start sterilizing jars. You need 7 half pint jam jars per batch of peaches. This low sugar jam doesn't last long when it's opened so I try not to make jars bigger than the 1 cup size. I ran out though so I used a few full pint jars. I may use that for cake filling so it gets used up all at once.

I use a silicone trivet in the bottom of a stock pot for my canning pot. Put 7 jars in the pot and start it boiling while you work on the peaches.

Take a bowl out of the refrigerator and pick out the rosemary sprigs and as much of the ginger as you see.
Scoop the cut up peaches into a food mill with the plate with large holes. Process all the peaches to a puree.
Repeat with the second bowl of peaches.
Measure out 6 cups of pureed peaches into a bowl. Repeat with another bowl.
Add citric acid and calcium water.
  • 6 cups peach puree
  • 1 1/2 tsp citric acid
  • 6 tsp calcium water
Check on jars and swap first batch for second batch to get them all sterilized.

Measure sugar and pectin into 2 bowls. Each bowl gets.
  • 1 cup sugar
  • 4 tsp pectin
Get all jars into the pot of boiling water and set it aside.

Put one bowl of peaches into the pot. Stir over high heat until it boils. (about 8 minutes)
Add one bowl of sugar + pectin. Stir and bring to a full boil (no more than 3 minutes)
Turn off the heat.
Remove 7 jars from the pot and fill them with the hot jam.
Add hot water to the jar lids to soften the glue
Wipe down the rim of the jars with a wet paper towel and put on lids and rings. Set these jars aside.
Wash the pot, funnel, and scoop.
Start the second batch of jam.
Heat and stir to boiling,
Add sugar and pectin in the second bowl.
Boil again.
Fill jars, add lids.
Put canning pot back on to boil.
When water is boiling add the first batch of jam jars.
Time 10 minutes.
Remove jars from the water bath.
Put the next batch of jars in.
Time 10 minutes.
Remove the jars from the water bath.
When all the jars have sealed, the lid has sucked down and gone PLINK! then you can unscrew the rings and dry the threads and wipe off the jars.

If you still have peaches left repeat this whole process. You already have a pot full of boiling water! You can start right away blanching more peaches. Repeat for as many days as you have peaches.

This process yields 1 half pint jam jar for every 1.75 peaches. These were quite large peaches I had this year. You can calculate your own yield after you do your first batch. I started with 17 peaches and then raised that number to 24 to make it come out even at 7 jars per batch.

Materials needed: You can get most of this stuff at Walmart. They sell the jar lifter, magnet on a stick, canning funnel, citric acid and ascorbic acid (branded as Fruit Fresh), jam jars and lids, and big plastic bowls with lids. I also got the crock pot there. My enameled cast iron jelly pot I got from Tuesday Morning.

Saturday, May 11, 2019

Reusing a makeup mirror if one side gets broken

My niece Brenna was here last week with my brother. He picked her up from her dorm and came straight here. In the process of rearranging their luggage before driving back home to South Florida he broke her makeup mirror. She left it here and told me to throw it away. I can't just throw something away. It has parts I can save!

It would be lovely if these lighted mirrors had a circle light inside that I could use for shooting videos. That is not the case though. It's just two 20 watt bulbs behind some extra foil on the back of the glass.


The dimmer switch only controls one of the two bulbs.


The magnifying side of the mirror wasn't broken so I put a wire between the screw holes on the frame and hung it on the wall in my lab with some LED string lights behind it. Now if I get something in my eye I can see to get it out!


I'm saving the cord, lightbulbs, and dimmer. I'll just throw these in my bin of lamp making supplies in case I ever need them for a project. NOW I can throw the rest away.

Making a Fake Cake: Lessons Learned from Failure

I recently went off on a two week tangent from sewing work and did a deep investigation into papier-mâché (Or in easier-to-type Americanized spelling, paper maché.) Hat tip to Jonni at ultimatepapermache.com and her YouTube Channel. I love her. I also researched the art of making cold porcelain clay from scratch (glue and corn starch) and making that into flowers. This is also amazing. I like Christina Wallis's YouTube Channel for tutorials on how to make permanent flowers that look real.

I was interested in making an elaborate faux wedding cake with a plain cake underneath it. In my mind it would be glorious. And the reveal would be hilarious. It turns out nobody else got it. I made a prototype birthday cake version and the future bride was ambivalent about it. And somebody anonymously arranged with her caterer to pay for her wedding cake. So she went to meet with a baker the day after her birthday. I'm off the hook for wedding cake! But I did learn some things I'd like to record in case I need to use any of these techniques again later. Or if anybody has this same idea and has an actual need for the final product you can use what I learned to start out ahead. There is more work to be done, for sure.

What I learned that I didn't find online in other tutorials:
  • Hair coloring tools are great for paper maché work
  • You can make fake bark out of joint compound, bentonite, and Floetrol
  • Hat boxes actually aren't great for fake cake -- use the styrofoam like in all the tutorials
  • Plain All-Purpose sheetrock mud is the best fake icing

Leaves:

The first thing I tested was the idea to paint real leaves with some sort of polymer mixture, let it dry, then peel off the leaf. Voila, permanent decorative leaf. I started experimenting with ingredients I had on hand because my car was in the shop and I couldn't go get sheetrock mud to start the cake experiments. Things I mixed together:

  • Chalk like you use with a chalk line
  • Elmer's Glue
  • Plaster of Paris
  • Acrylic Paint
  • Mineral Oil

I painted this stuff on beech tree leaves and dried it in the sun. 
Various formulations of setting plaster type ingredients
It was still spring and my leaves were pretty new. This made them curl up a lot when they dried out. It would be better to use mature leaves for this. 

The PVA glue made the molds stay flexible when they were peeled off. This was kind of weird. It mostly works though! If you really wanted to make a lot of green leaves it might be worth buying some granular white chalk. I found it online pretty cheap from soap suppliers. I started with bright blue chalk and added yellow paint until it was green. I shot video, but it didn't work well enough for me to want to edit it.
Faux leaves peeled off the real leaf after drying

Faux Icing:

The second thing I experimented with was what sort of product works best for fake icing on a fake cake.
  • All-Purpose Joint Compound -- The Winner. But you need to paint it after it's dry.
  • Lightweight Spackle -- looks grainy
  • Mixture of these and PVA glue -- ok if you want a glaze, otherwise useless
Plain sheetrock mud on a foam core rectangle. Top half painted with white acrylic paint.
I got a quart of Pro-Form All Purpose Joint Compound at Walmart. It was less than $4. It's important to mix it up really well before you use it. You need to put it on thin and let it dry between coats. I rushed my final project and it cracked from being too thick. But if you do it thin you can even polish it with a damp offset spatula just like icing.

The other things I tried weren't as good.

Lightweight Spackle
Lightweight Spackle mixed with Elmers Glue

Tree Bark Cake Plate

My niece has been pinning pictures of wedding cakes she likes and a lot of them have these logs under them. I looked up log cake stands on Etsy and they run about $100 including shipping. They're heavy. I have access to trees and thought about making some of these. This would help me rationalize why I'm making a fake cake, as a prop to pose on my log cake plates. I can't get anybody to saw my logs for me though, so I'm not doing that anymore.

If anybody really wants a heartwood cake stand I would take that commission. It will cost about $500.

I think the bark is the thing people want though and that's not really the kind of trees I have in the 13" diameter range. I have Longleaf pine. There are green pine cookies on Etsy, which kind of freaks me out. All that sap! If I made one out of aged heartwood the sap would be crystalized and the wood wouldn't check. But it would weigh twice as much as these ones that are all sapwood and bark.

I decided to incorporate the log base into my cake cover idea. I got a styrofoam wreath form at the craft store that was bigger than one of my hat boxes. But first I have to test some ideas for how to make bark. 

Sassafras bark with a Pipevine Swallowtail caterpillar

Paper maché boxes were on sale at the craft store store so I got some small ones to experiment on. My first attempt at faux bark was simply the cheapest toilet paper I could get at the grocery store torn into little pieces and stirred together with methyl cellulose. I had some of that already mixed up. (I bought the powder on ebay a couple of years ago to use for marbling paper. I gather from Jonni from ultimatepapermache.com that Elmer's markets methocel as paper maché paste. Here it is on Amazon.)

  • Shredded toilet paper
  • Methyl cellulose (methocel)

White bark look on paper mache box lid, just toilet paper and methylcellulose
This could be pretty if you were going for an all-white look.

But I wanted something barkier. I found a technique for throwing clay pots where the artist would throw a pot on the wheel then heat the outside with a torch and then enlarge the pot some more, which made the outside crack like bark. Neat! Well, I have some clay that does that all by itself, that expansive bentonite clay they sell at the health food store for facials. So I tried mixing that with methyl cellulose and put it directly on a paper maché hat box lid.
Looks neat, flakes off

It looked cool, but it didn't stick to the paper underneath. So I picked it all off and tried something else.

Magical ingredients in bark clay
I tried one part joint compound, one part expansive clay, just gauging by eye, and enough Floetrol acrylic paint additive to make it a useable consistency. I just smooshed it onto the surface with the plastic spoon I stirred it with and sort of made peaks in it like you would do with chocolate cake icing.

Wet bark
Dried bark on the first experimental prototype.


That worked great.

Here's how it looks paired with a prototype fake cake with out-of-scale cold porcelain molded flowers. I dry brushed a little white paint on the bark to accentuate the texture.
Mini Fake Cake
Because of the texture of the fake icing I had to use hot glue instead of tacky glue to attach the flowers. It looks pretty bad. If you are doing this for real be patient and use tacky glue and not hot glue. Maybe even put glue on the flowers and push them into the wet joint compound. But I'm moving on anyway.

Time to scale it up and do one big enough for an actual cake. Here's my plan:

Hat box and styrofoam wreath form fit check
I decided one problem with those tree cookies people are using for cake plates is they would be really hard to pick up. They need some kind of hollowed out place for you to get your fingers under there. So I incorporated that into my styrofoam version.

The next problem is that hat boxes are sort of flimsy and won't stay round. Flexing would crack the faux icing for sure. So to stabilize the shape of the paper maché box I cut a groove into the sytrofoam for the box to push down into.

Groove to stabilize the hat box shape
I need to cover the styrofoam with paper maché. I used torn up kraft paper and school glue watered down. I used my hair coloring bowl and brush for this. That works great. I decided to use newsprint for the top since I had some. I cut it into rings the right size and clipped the edges to go around the curves.
Plan out the paper covering for the top of the log
I drew tree rings on the paper with a pencil. Since I didn't know if this was going to work I didn't strive for perfection. Only proof of concept.

Draw tree rings on the part that will show
Black construction paper for underneath the bark


I covered the outside with black construction paper pasted on with Elmer's school glue watered down enough to make it brushable. Jonni from the paper maché videos would probably use flour paste but in South Georgia that sounds like a disaster of bugs and mold. She says she doesn't like the way it feels when PVA glue dries on her hands. I didn't notice it ever getting a chance to dry on my skin.

I pasted on the newsprint tree rings and the inner covering after the black paper. I let that dry in front of the air conditioner overnight. Then I added a layer of tan tissue paper over the penciled lines. That gave me the subtle effect of tree rings I was after. It's kind of wrinkly though. I had wrinkles in my newsprint so I knew it was going to be inferior. If you really need to make something like this and want it to look good there are lots of decoupage techniques that could make this look amazing. Do more than what I did.
Add tissue paper over the tree rings for a more realistic wood look
All that paper and paste work took a long time. If you get into this be sure you have a good audio book and nothing to disturb you. You can't pick up the phone when you have this stuff all over your hands. When you add water to Elmer's it makes it take an amazingly long time to dry. It's kind of nice so you don't have to rush to get back to an overlapping edge. I expect Mod Podge would work for this too but Elmer's is cheaper and doesn't smell as bad to me.

When it's all dry you can move on to the bark. I optimistically started to mix this in my hair color bowl then realized it was too small and moved it to a big mixing bowl. I thought about using an electric mixer but I didn't do it. I just stirred it with a rubber spatula.
Sheetrock mud, clay, and Floetrol
The mixture was kind of weird, not as muddy as the first batch I made. I may have used more sheetrock mud in this version? Not enough Floetrol? The proportions could stand to be refined. This had a putty like consistency so I sort of patted it on the sides.
Squishing the bark mixture on the sides
While the bark was drying I moved on to painting the inside of my hatbox. I did a few coats of white acrylic paint. I wanted to seal it so I could wipe off any icing that might get on it and so I could be sure it's clean before I put it over a cake.
Paint the inside of the hat box

At this point in my experiment my niece was in Beachton to visit and had already seen what I'd made so far and expressed zero interest in this concept. So I was just finishing it for the sake of finishing it at this point, knowing I wouldn't go any farther with this idea. I hot glued the hat box into the wreath shape and slathered it with sheetrock mud. I did it way too thick and I knew it was going to crack. I was on a clock and I just didn't care.

Now, how does this actually work IRL? I ordered an 8" cake from the grocery store app on my phone. I asked for nothing but the plain icing, no decorations. I froze it for a few days. After it thawed out I tried using my offset spatula to make the kind of texture Kate likes in a cake. That didn't work either. My failure spiral is expanding. But I shall press on with the experiment and put it under my new spit cake.


Kate asked me to digitize the video from her second birthday party. This forced me to closely examine how much she spit on her Winnie the Pooh cake back in 1998. This should motivate some people to make a fake cake like this just for kids parties.


What I would do better if I did this again:

  • Make the bark mix wetter so it could be put on like the prototype, with peaks in the application.
  • Put some expansion joints in the bark from the beginning so it gets more vertical cracks than horizontal cracks
  • Use a more subtle color than black for the background
  • Add a bit or paint to the bark mix to get a darker color
You could do a lot of colors and make the bark have realistic lichen on it and stuff, but for a cake I sort of liked the texture minus color. The all white bark prototype looked really elegant to me. I might try to refine that a little bit with some paper pulp and expansive clay and white paint. If I had the need for such a thing. 

Smooth icing and white paper pulp bark cake plate

White cold porcelain flowers on the white cake

This little prototype is sort of the proof of concept of the all-white elegant cake look. I don't know why anybody would want to combine elegant with rustic in this way, but it's oddly compelling to me. Somebody should do it full scale in a bakery window and let me know what kind of response you get.

I also think hat boxes are just too flexible. For doing a tree tier fake cake I thought about reinforcing them with sections of cardboard tubing cut on my chop saw. Hot glue these inside and have your three tiers not go all saggy in the middle.
Top view three hat box stack with cardboard tube pillars
I think for a display cake for a shop window or a prop cake for photos the actual styrofoam cake forms at the craft store would be a better option than hat boxes. I didn't buy them because they were just so expensive. I was reserving that option for the contingency that my niece actually wanted this. Fortunately I was able to end the project after the fun research phase.

Styrofoam cake forms at the craft store
I haven't said much about my experiments with cold porcelain. That's because I mixed up a batch and made it work but my plan for actually making flowers required the participation of some of my nieces with strong hands and a love of squishing things. There is too much kneading required for my current state of arthritis. It's neat though! You can make realistic looking flowers and they don't die. And they don't contaminate a real cake either. You don't even need a fake cake to use fake flowers.

My problem with real flowers on a cake:

  • Latex floral tape to wrap the flower stems. I'm allergic to latex.
  • Serving the cake is complicated by needing to remove the decoration first
  • The plated cake looks gross if there's been stuff stabbed into it
  • Flowers have to be added at the last minute so they don't wilt
I have made a wedding cake with real flowers on it. But I arranged them in a ramekin and just plopped them on top after all the icing was done. I was a lot younger then and could squeeze an icing bag to make a lace pattern icing which was popular back in the '90s. It was easy to just lift off the arrangement and cut the cake. What is popular now is flowers flowing down the sides. I can't help thinking that's going to look yucky on the inside. Square cake back in the kitchen, fake cake with all the flowers you want out by the buffet. That sounds good to me! But I'm not having a wedding. Ever. Hell no. Yuck.